GitHub Actions と Google Test を使って Arduino のライブラリに動的テストを導入する

以前、Arduino のライブラリに静的テストを導入する方法を紹介しました。
GitHub Actions と arduino-cli を使って Arduino のライブラリに静的テストを導入するこちらのテストはコンパイル時のテストのみで、プログラムを実際に動かすテストができません。OpenCV 等の中規模、大規模なライブラリでは、Google Test 等を用いて、動的なチェックが行われるのが普通です。
そこで、Google Test を使って動的なテストを行います。このテストは先ほどの静的テストと併用できます。
このテストは純粋な C++ で書かれたアルゴリズムでないと動かせられません。例えばユーザー定義型を提供している場合などに有用です。
また、筆者はヘッダーオンリーライブラリでしか使用した経験がありません。ソースファイルに分割されている場合、複雑になることが予想されます。
テスト用のディレクトリを構成
CMake を使ってビルドするので、テスト用ディレクトリの各ディレクトリに CMakeLists.txt を配置します。
MyLibrary
│
├─ .github
│  └─ workflows
│     └─ UnitTest.yml
├─ src
│  ├─ Algorithm
│  │  └─ Math.hpp
│  └─ MyLibrary.hpp
│
├─ test
│  └─ UnitTest
│     ├─ Thirdparty
│     │  └─ googletest    <-- サブモジュールとして追加
│     ├─ Algorithm
│     │  ├─ CMakeLists.txt
│     │  └─ Math.cpp      <-- テスト用ソースファイル
│     └─ CMakeLists.txt
│
├─ .gitignore
│
└─ library.properties
Google Test はサブモジュールとして追加しておきます。
# run in MyLibrary/
git submodule add https://github.com/google/googletest.git test/UnitTest/Thirdparty/googletest
src/MyLibrary/Algorithm/Math.hpp
#pragma once

namespace Math
{
    inline int Factorial(int n)
    {
        if (n <= 0)
            return 1;
        else
            return n * Factorial(n - 1);
    }
}
src/MyLibrary.hpp
#pragma once

#include <MyLibrary/Algorithm/Math.hpp>
.gitignore
テストの実行バイナリ系は不要なので追跡から除外しておきます。
test/UnitTest/Build/
library.properties
name=MyLibrary
version=1.0.0
author=HogeHoge
maintainer=HogeHoge
sentence=HogeHoge
paragraph=HogeHoge
category=Other
url=http://example.com/
architectures=*
親ディレクトリの CMakeLists.txt を作成する
test/UnitTest/CMakeLists.txt
cmake_minimum_required(VERSION 3.14)
project(UnitTest)

if (MSVC)
    add_compile_options(/std:c++14)   # C++14
    add_compile_options(/permissive-) # C++標準に準拠
    add_compile_options(/wd4819)      # エンコーディングの違いによるエラーを無効化
endif()


# GoogleTest 設定
set(gtest_force_shared_crt ON CACHE BOOL "" FORCE)
add_subdirectory(${CMAKE_CURRENT_SOURCE_DIR}/Thirdparty/googletest)
include(GoogleTest)
enable_testing()

# 子ディレクトリの CMakeLists で使えるよう、インクルードディレクトリ(src)のパスをキャッシュに保存
get_filename_component(ABSOLUTE_LIBRARY_DIR "${CMAKE_CURRENT_SOURCE_DIR}/../../src" ABSOLUTE)
set(LIBRARY_DIR ${ABSOLUTE_LIBRARY_DIR} CACHE STRING "include path")

# 子ディレクトリを登録
add_subdirectory(./Algorithm)
test/UnitTest/ 下にサブディレクトリを追加した場合、add_subdirectory を用いて、ディレクトリがあることを明示する必要があります。
子ディレクトリの CMakeLists.txt を作成する
test/UnitTest/Algorithm/CMakeLists.txt
cmake_minimum_required(VERSION 3.14)

# 実行ファイルを追加
add_executable(AlgorithmTest
    Math.cpp
)

# インクルードディレクトリを設定
target_include_directories(AlgorithmTest PUBLIC ${LIBRARY_DIR})

# Google Test とリンク
target_link_libraries(AlgorithmTest gtest_main)

# テストケースを追加
gtest_discover_tests(AlgorithmTest)
テスト用ソースコードを作成する
Google Test が提供している TEST マイクロを利用して、下記の様にテスト用関数を定義します。
test/UnitTest/Algorithm/Math.cpp
#include <gtest/gtest.h>
#include <MyLibrary/Algorithm/Math.hpp>

TEST(Factorial, HandlesPositiveInput)
{
    EXPECT_EQ(Factorial(1),   1);
    EXPECT_EQ(Factorial(2),   2);
    EXPECT_EQ(Factorial(3),   6);
    EXPECT_EQ(Factorial(4),  24);
    EXPECT_EQ(Factorial(5), 120);
}
Google Test の提供する EXPECT_EQ マクロを使って、右辺と左辺が同じであるかのテストをしています。
別の種類の比較用マクロや、例外を送出できるかのテスト等もできますので、詳細は Google Test のドキュメントを参照ください。Google Test ドキュメント - アサーション
テスト用ソースファイルを追加する場合は、同じディレクトリにある CMakeLists.txt の add_executable に登録する必要があります。
test/UnitTest/Algorithm/CMakeLists.txt
add_executable(AlgorithmTest
    Math.cpp
    HogeHoge.cpp
    HugaHuga.cpp
    ...
)
ローカル環境で実行できるか確認する
以下のビルド、テスト実行コマンドを test/UnitTest ディレクトリで実行します。
cmake -S . -B Build
cmake --build Build
cd Build
ctest --output-on-failure
cd -
CMake がない場合インストールしてください。Windows の場合 winget パッケージマネージャーでインストールできます。
winget install -e --id Kitware.CMake
上手く行くと次のようなビルドログや、テスト結果が出力されるはずです。Passed と出ていればそのテストは合格となります。
-- Building for: Visual Studio <略>
-- Selecting Windows SDK version <略> to target Windows <略>
-- The C compiler identification is MSVC <略>

-------- 略 --------

    Start 1: Factorial.HandlesPositiveInput
1/1 Test #1: Factorial.HandlesPositiveInput ...   Passed    0.02 sec

100% tests passed, 0 tests failed out of 1

Total Test time (real) =   0.12 sec
GitHub Actions の設定
.github/workflows/UnitTest.yml を以下の様に記述します。やっていることは先ほどのコマンドの内容と同じです。
name: Unit Tests

on:
  push:
    paths-ignore:
      - "**.md"
  pull_request:
    paths-ignore:
      - "**.md"

concurrency:
  group: ${{ github.workflow }}-${{ github.ref }}
  cancel-in-progress: true

jobs:
  unit-test:
    runs-on: ubuntu-latest

    steps:
      - name: Checkout
        uses: actions/checkout@v4

      - name: Clone submodules
        run: git submodule update --init --recursive

      - name: Build
        working-directory: test/UnitTest
        run: cmake -S . -B Build && cmake --build Build

      - name: Run tests
        working-directory: test/UnitTest/Build
        run: ctest --output-on-failure
GitHub へプッシュする
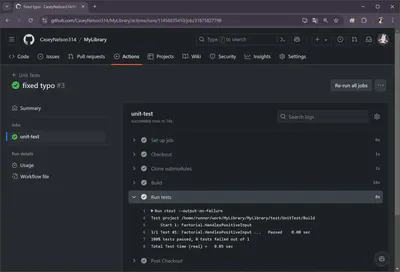
変更をプッシュすると Actions タブにてテストが実行されていることを確認できると思います。

こちらにレポジトリを公開しています。